Tag Archives: food

Glazed figs with mozzarella

In anticipation of all the juicy figs our new fig tree is going to produce I thought I would share this lovely recipe with you. Last Christmas we had this as a starter, an alternative to the usual curried parsnip soup. It is quick and easy and very tasty. It takes 20 minutes and serves 8 people.

Ingredients

  • 12 figs halves or quartered
  • 3tbsp sherry vinegar
  • 2tbsp caster sugar
  • mozzarella, 3 balls torn into pieces
  • 8 slices parma ham
  • 50g rocket

Method

  1. Put the figs cut side up on a baking tray. Mix the sherry vinegar and sugar then spoon over the figs. Grill for 6-8 minutes until glazed.
  2. Divide the figs between the plates then add the mozzarella, parma ham and rocket.
  3. Spoon over the cooking juices as a dressing.

Per Serving 276 kcals, fat 19g.

IMG_0914

The best tomato pasta in the world!

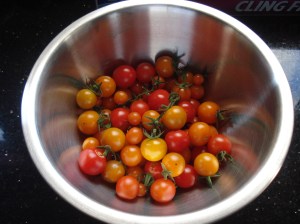
In any normal year, come August and September, Mr Mac and I usually take on an orange glow due to the amount of tomatoes we eat. Our staple diet is usually this simple pasta dish which originally came about as we had to find ways to use up all the tomatoes.

This year it was 21 September before we ate it for the first time and I have been waiting all summer to share it with you!

It takes minutes to prepare and you can leave it in the oven for an hour and go potter in the garden.

Ingredients

  • one big bowl of tomatoes
  • spaghetti
  • olive oil
  • balsamic vinegar
  • salt and pepper

Method

  • Fill a bowl with ripe tomatoes.


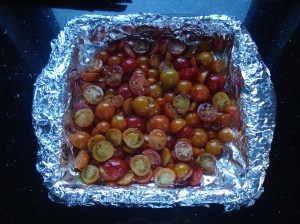
  • Wash and slice in half (or quarters if they are large).
  • Place in a roasting tray and add a generous helping of salt, freshly ground black pepper, a drizzle of olive oil and a glug of balsamic vinegar.


  • Place in an oven pre-heated to 180 degrees C until the mixture has reduced and the tomatoes have started to caramelise. This usually takes about an hour. Check after 30 minutes and give it a stir. It will look very watery but, trust me, it will reduce down to a gorgeous sauce.


  • Boil and drain the spaghetti and stir in the tomato sauce.
  • Enjoy!


We have tried adding garlic but I think this makes it bitter. Chorizo works well cut into small cubes and also using chilli oil instead of olive oil adds a nice bit of heat. However, I believe the tomatoes are always the star of the meal and this is definitely a case of less is more.


The best blackcurrant jam

It used to be that Mr Mac made jam and I made chutney. Usually because Mr Mac has a short attention span and when I would still be up at 2am stirring the chutney, patiently waiting for the vinegar to evaporate and a “channel” to form, he would be giving out zzzzz’s, the jam finished hours ago.

However, I’m not sure how it happened but I seem to be the one who makes the blackcurrant jam now (not the gooseberry, raspberry or strawberry though). So despite the awful weather, we picked a bumber crop of blackcurrants at the weekend – just over 6lbs from 2 bushes. Don’t quote me but I have a sneaky feeling blackcurrants have a strong Scottish connection and therefore thrive in the dreich, damp, drizzle!

Anyway, between us we have been making this jam for years. It gets rave reviews from everyone who tries it and it is so simple and quick to make although I must credit the Goddess that is Delia as the recipe is hers!

ingredients (for approx 9-10lbs)

  • 3lb blackcurrants with the stalks picked off and washed
  • 1.5 pints water
  • 3lb 12oz sugar

method

  1. Put the oven on to a medium heat. Sterilise enough jars for about 10lbs of jam. I put them in the dishwasher and then stick them in the oven.
  2. Measure the sugar and put it in the oven to warm it through.
  3. Put a couple of plates in the freezer (seriously – trust me!).
  4. Put the blackcurrants and water into a large pot and slowly simmer until the fruit is tender. You want to try and keep some of the fruit whole.
  5. Tip in the warm sugar and stir it in gently until it has all dissolved. Coat the back of the spoon and you will be able to see if the sugar has not dissolved.
  6. Once all the sugar has dissolved, turn the heat as high as it will go and boil the jam rapidly for 10 minutes.
  7. Get a plate out of the freezer and spoon some of the jam onto it. When the jam is cool, push it with your finger and if a crinkly skin has formed, it has set. If not, boil again for 5 minutes and keep doing the set test.
  8. Remove jars from the oven (remembering to wear oven gloves – just giving you the benefit of my personal experience) and I use a ladel to fill a measuring jug which makes it easier to pour the jam into the jars.
  9. Tighten the lids and leave to cool. Depending what type of worktop you have place the jars on a wooden chopping board if you have one. Granite, slate or stone might cause the jars to crack.

Two important points to remember. First, scoop some jam into a little ramekin so you can try some on toast or with creamed rice for your supper. Secondly, make sure you keep a Mr Mac (or equivalent) handy so when, in the middle of the night, the lids start to pop, you can send him downstairs to check it is not a burglar!
Enjoy!

The great big giant parsnip experiment

We love parsnips. I have a fantastic recipe for curried parsnip soup which we eat all winter and there is nothing better than picking your own parsnips and brussels sprouts for Christmas dinner. Parsnips roasted with honey, black pepper and olive oil…yum.

The only problem is that our ground is very stoney and while we do pull up the occasional monster parsnip, most of them look like an octopus.

We were watching a gardening programme last summer (think it was Beechgrove Garden, BBC Scotland’s answer to Gardeners’ World) and one of the presenters was planting his parsnips seeds for competition. He was using a really tall bucket and had various “top secret” blends of compost, the details of which he was not going to share with the viewers.

Mr Mac suggested we try and do the same thing with the broken water butt lying at the bottom of the garden…so we did!

We filled the bottom with gravel and crocs for drainage then filled it to the top with our own compost. Mr Mac made seven holes right to the bottom with a broom handle and we filled the holes with sand. We planted two seeds in each hole with the intention of thinning out the weaker seedling (which I never did…oops!).

Now this took place in August last year, in hindsight probably a bit late. The seeds germinated and then were forgotten about over winter. I started to water them again in the spring and the leaves were growing taller and taller. I thought if the root was half as long as the leaves were tall we were in for a treat.

Then this morning we were having a look at them and decided to pull one out to see how it looked. Here it is…

Disappointed, we pulled out another couple and they were no better. Somehow I don’t think I’ll be trotting off to the village hall to pick up my “best in show” rosette!

We have left the rest of the parsnips in the water butt to see if they grow any bigger. I’ll keep you posted!

Jobs for May

Well, for the first day in May we have some hazy sunshine and it is not raining! It is still quite cold though.

May is the month to start sowing outside and hardening off seedlings to plant out when the soil becomes warm enough.

Is anyone else getting a sore neck from gazing at the sky, wondering when the sunshine will return?

I have a bit of a backlog in the greenhouse. Lots of plants successfully germinated in March are ready to go into cold frames (which have not been built yet!) but after what happened in April I fear for their future if I put them outside.

Brassicas outside but kept under a net just to be on the safe side!

I put the brassicas out during the day and put them back inside at night but not only is there still a risk of frost damage, the slugs have slithered out of hibernation (do slugs hibernate?) and are starting to nibble. It’s like living in a war zone!


Anyway, I have checked the books, encyclopedia, manuals, handbooks and magazines and here is a summary of what we should all be doing in the month of May.

Jobs to do:

  • Harden off frost tender plants
  • Once the last risk of frost has passed, plant crops outside
  • Start watering newly planted fruit and any grown in pots
  • Keep an eye on the pest situation – flea beetle, slugs, snails, pigeons, aphids and carrot flies…where does it end…
  • Keep growing small quantities of salad
  • Hoe and weed regularly
  • Keep haunching up potatoes – we have still to sow the maincrops which should really have been done last week but I’m sure one week won’t make a huge difference.
  • Put in supports for peas and beans. We use the prunings (or whips) from the apple trees – the ultimate in upcycling!
  • Net fruit trees and bushes and check for diseases and pests
  • Remove raspberry suckers and strawberry runners
  • Support tall plants as they grow
  • Finally, remember to sit down and enjoy your hard work!

I am going to grow tomatoes, peppers, chillies, aubergines and okra in the greenhouse.  I have brassicas, leeks, shallots and celeriac ready to plant out but will probably wait until the second half of the month. I have sown some peas outside as well as beetroot and parsnips but I also plan to sow beans, spinach, Florence fennel and swedes.

So it is shaping up to be a busy old month!

The greenhouse is full!

Speedy suppers – mango chicken with couscous

Being quite far north in the UK we have the benefit of light nights in the summer. Already Mr Mac and I have still been out working in the garden at 9pm (just once though!).

At this time of year when there is so much to do outside, it is great to be able to work well into the evening. The last thing you want to do is spend hours in the kitchen making dinner.

I found a little booklet last week called 25 Quick Fixes – meals in 20 minutes or less! There are some great recipes for quick but tasty meals. I tried this one and it was delicious…and it definitely took less than 20 minutes to make.

Ingredients (serves 2)

  • olive oil
  • mini chicken fillets about 350g or just cut 2 chicken breasts into thin strips
  • ground cumin 2 tsp
  • chicken stock  300ml hot
  • couscous 150g
  • mango chutney 3 tbsp
  • spring onions 4 sliced into 3cm pieces
  • coriander a small handful roughly chopped

Method

  1. Heat 1 tbsp of oil in a wok or large frying pan. Sprinkle the chicken with the ground cumin and cook for a couple of minutes until lightly browned.
  2. Pour 200ml of the chicken stock over the couscous and leave to soak for 5 minutes.
  3. Add the mango chutney to the chicken, stir well and leave to bubble for 2 minutes.
  4. Add the remaining chicken stock and spring onions and cook for 5 minutes or until the chicken is cooked through.
  5. Fluff up the couscous with a fork, stir half the coriander through the couscous and the remainder through the chicken.
  6. Serve and enjoy!

For the health concious among you each serving has 505 calories and 10.4g of fat.

Take the lettuce leaf challenge!

Now that the weather is (supposed to be) getting warmer, thoughts turn to salad rather than hearty, warming soups. However, it breaks my heart having to buy lettuce, especially when I know my own will be ready to start eating next month.

I was looking at the price of bagged lettuce in the supermarket. Prices range from 80p to £2.00. I go through a couple of bags a week  so if I spend an average of £3 per week on lettuce from April to September, that works out about £72!

(I do realise I could spend less on an actual lettuce and cut it up myself…but I’m lazy!)

Now I have never had much success growing whole lettuce, whether it be cos, little gem, iceberg or butterhead. However, lettuce leaves of the “cut and come again” variety, thrive.  I believe even the most neglectful gardener would find it hard to kill them off! You don’t even need a garden to do this.

For less than £10 you can have an endless supply of lettuce leaves on your windowsill, at your back door or in your greenhouse, all summer long. All you need are some pots, some multi-purpose compost, crocs for drainage and a selection of seeds.

I use Suttons “speedy veg” lettuce, some of which can be ready to eat in as little

"speedy veg" - ready in 3 weeks!

as 3 weeks, some rocket, spinach and perhaps lollo rosso for some colour. Make sure each packet of seeds contains around 500-1000 so it will last all summer.

Put some crocs (broken crockery or gravel) in the bottom of a pot and fill it with compost. Next, I get an egg cup and open each packet of seeds. Pour a little from each packet into the egg cup, mix together, then sprinkle over the surface of the compost, cover lightly with some more compost and water in.

In 3 to 4 weeks you can start picking and eating the leaves. The “cut and come again” type should last a few weeks so every 2 or 3 weeks sow another pot and by the time the first one is finished you will have a new pot all ready to tuck into.

I have used one side of a small growbag. These are the seeds I started last week. In a couple of weeks I'll sow some more in the other half of the growbag.

Keep the pots in a bright sunny place close to the kitchen.

Keep the compost moist, never let it dry out.

Keep a look out for slugs and snails.

Sow little and often .

Think of what you can buy with the money you’ll save!

Enjoy!

Tea Break – Lemon drizzle cake

This is a great cake for your afternoon tea break. The lemon gives you a hint that summer is on the way but in cake form it is the perfect comfort food. Slice it up and keep it in a sealed container for up to a week……if it lasts that long!

Ingredients

  • 175g unsalted butter, softened
  • 175g caster sugar
  • Finely grated zest of 3 lemons
  • 3 medium eggs
  • 175g self-raising flour
  • A pinch of sea salt
  • A splash of milk (optional)
  • 200g icing sugar
  • 75ml lemon juice

Method

  1. Grease a large loaf tin, 1 litre capacity and line the base and sides with baking paper.
  2. Put the butter and sugar in a large bowl and beat together until pale and fluffy.
  3. Add the grated lemon zest and then beat in the eggs one at a time, adding a spoonful of flour with each (to stop the mixture curdling).
  4. Sift the remaining flour and salt into the mixture and fold in lightly using a large metal spoon. Add a little milk, if necessary, to achieve a good dropping consistency.
  5. Spoon the mixture into the tin, smooth the top and place in an oven pre-heated to 170C / Gas Mark 3. Bake for 45-50 minutes, until a skewer inserted in the middle comes out clean.
  6. Put the icing sugar in a bowl, add the lemon juice and stir together until smooth. Leaving the hot cake in the tin, use a fine skewer to make holes over the top of the cake, going quite deep but not all the way to the bottom. Spoon the lemon icing slowly over the cake so it all soaks in.
  7. Leave in the tin until cool, then turn out and serve in slices.

Mr Mac is growing chips!

One of the first things we did in our garden when we moved here was plant loads and loads of potatoes because they are good for breaking up the soil.  Mr Mac had experience of growing potatoes but when he started talking about seed potatoes, chitting, first earlies, second earlies, maincrop and haunching I realised there was slightly more to growing potatoes than I thought.

It sounded complicated and for a while I buried my head in the sand and just let Mr Mac get on with it. However, this year I decided to “face the fear” and work out what it is all about. After all, everyone else seems to be doing it so it can’t be that hard!

So here is my quick guide to growing potatoes:

  • Seed potatoes are not seeds but commercially cultivated tubers which you buy in bags from garden centres.
  • Potatoes are classified according to the length of time they spend in the ground. “Earlies” are ready for lifting first, then “second earlies” and in late summer, early autumn, “maincrop” varieties.
  • Potatoes will be ready to harvest sooner if the seeds are encouraged to develop shoots or sprouts before they are planted. This is known as “chitting”.
  • As potatoes grow, draw up earth around the stem so only the tip is exposed. This is known as “earthing up” or “haunching”.
  • First and second earlies are ready for harvesting when the plant flowers and the foliage is still green.  For maincrops, once the plant has gone brown and died completely, cut it down to ground level but leave the potatoes in the ground for another week. This allows skins to harden for storage.
  • Maincrop potatoes should be lifted on a dry day and left on the surface for a couple of hours to dry. They should be stored in a cool dark place in a hessian sack which allows moisture to evaporate.
  • Crop rotation is important.  Never plant potatoes in the same place two years running.

What we do

That first year we had so many potatoes we could have put McCain’s out of business! The purpose of growing so many was to break up the soil, which it did, but it also meant we were overrun with potatoes. We have never managed to store them successfully and the other major problem we had was worms. Probably 75% had been eaten by worms. We know worms are good for the soil which is fine as long as that is where they stay!

We had the same issue in year 2, even though we grew them in another part of the garden so Mr Mac decided all potatoes must be grown in a worm free zone. The solution? Compost bags turned inside out, a half whisky barrel and some deep pots.

We roll the compost bags down, put compost and one or two seed potatoes in the bottom and cover them. When the plant starts to grow, cover the stem and as more depth is required, just unroll the bag.

With the barrel and pots, the same applies. Start shallow and allow enough depth to keep adding compost until the potatoes are ready to harvest.

You can harvest one bag at a time by simply turning it out and collecting potatoes. There is no risk of stabbing the potatoes with a fork and they can be left in a quiet corner of the garden or kept inside and moved out once the risk of frost has passed. Easy!

Our favourites

This year we have planted a first early variety called “Foremost”. It will be ideal for new potatoes and salads. The other two varieties we love are both maincrops. Maris Pipers are good all-rounders and perfect for chips.  Pink Fir Apples have a pink knobbly skin, a waxy texture and nutty flavour, perfect with just some salt and butter mmmmmmmmmmmmmmmm.

Foremost first earlies being grown in a deep pot

The Foremost are well on the way.

The Maris Pipers and Pink Fir Apples are happily chitting in the greenhouse.

Maincrops chitting away

And finally…….

Mr Mac has an acquaintance who told him about an ingenious method he had devised.  He did not have any growing space in his garden so he used old car tyres and just kept piling them up and filling them with compost as the plants got taller. Apparently his mother was moaning about the tyres making the garden look untidy and had told him they had to go. His reply was, “They can’t go. I’m growing my chips in them”!

A little bit about herbs

Herb trough looking sorry for itself

Last year Mr Mac made me a herb trough from some old scaffolding boards he acquired. I painted it with some fence paint and planted lemon and golden thyme, marjoram, rosemary, parsley and chives.

I have just cleaned out the old leaves and twigs and given all the plants a tidy. I seem to have lost the marjoram though – it’s gone. The rest look quite woody and straggly but there is definitely new growth so hopefully they will all come back.

Then I remembered it’s Dougal’s Discount Wednesday at my local garden centre so I popped down and bought these new herbs – curry plant, lemon balm, roman chamomile, mint pineapple, chocolate peppermint and marjoram to replace the one I lost. Six plants for £9 plus Dougal’s 10% discount – a bargain!

I also grow ordinary mint but keep this in its own pot as it is very invasive. I have planted sweet basil and lemon basil seeds which I use for both cooking and as companion plants for the tomatoes and I might try growing coriander from seed – I am still thinking about it.

A funny story about coriander

A friend of Mr Mac’s brought us some chilli plants and herbs last year, one of which was coriander. Neither Mr Mac or myself are big fans of coriander (due to an incident in Goa in 1994!) but it was a gift and it seemed to grow quite happily in the greenhouse. Eventually I felt compelled to do something with it and as I had loads of carrots ready I decided on the old standard, carrot and coriander soup.

The soup was made and I tasted it and tasted it but no hint of coriander. I kept chopping it up and throwing in more and more but still not a hint of coriander.

At the time we had a heating engineer working on the stove in the kitchen and he fancied himself as a bit of a chef.  I asked him what he thought and where I was going wrong. He had a taste of the coriander and promptly killed himself laughing.The reason I could not taste the coriander was because it was flat-leaf parsley! The soup was still lovely, although very well garnished.

Lavender

Last year I tried growing  lavender from seed. The lavender was successful and it even flowered at the end of the summer. I had plans for a lavender hedge beside the deck where we sit on sunny evenings but I was so precious about planting it out and losing it over the winter that I left it in the greenhouse. Mr Mac covered it all in straw to protect it and it seems to have survived.

Fortunately, this week’s issue of Amateur Gardening magazine has a section on pruning shrubs. Apparently the lavender should have been pruned after it flowered last summer. This allows time to develop new shoots which will carry buds for this year’s flowers.

It does say that any old, dead flowering stems should be cut out but not to cut into old wood. This is where I get confused and I do not know what that means. Some of my plants look as if they are dead. Others are partly dead but with lots of new leaves and a couple are full of new growth. I can’t work out what is “old wood” and “new wood” though.

So this is what I have done. I cut off all the old dead bits right down to the base. Where there was a dead stem but with new leaves at the end, I cut off about a third of the new growth. Where the whole stem was new growth, I cut off about a third. I hope I have not damaged or killed them. I will wait a few weeks and if they look alright I will plant them out. I have sown some more seeds this year, just in case.

Here is what they looked like before and after!

Before pruning

After pruning